Taylor's Blog

Atypical ramblings

College Capers

It’s been two months since I last updated – time to type! I’ve been extremely busy lately. In the middle of September I was in China again visiting my fiancé for a week. We’re very excited because she will finally be joining me in the U.S. on November 5th! It was a very hectic week abroad – mainly spent with her close family and friends and preparing things for her departure. In addition, my first week of college at OSU began while I was abroad. It wasn’t too bad because OSU provided a VPN I could use to get over the firewall during that time.

Also in September I had the hectic process of moving into a new apartment with a close friend from college. It’s definitely a step up from where I was living before and really something I am not embarrassed to bring my fiancé home to. Just last weekend, I finished acquiring all the major furniture needed for the house including  a new couch, mattress and bed. I’m looking forward to just chlling out at home this weekend now that the place is finally furnished in an acceptable manner.

So now I am smack dab in the middle of CS 161 – Introduction to Computer Science. And so far… it’s going great! It’s stressful and demanding for sure, but that’s exactly what I was expecting. I am really glad to be moving forward in a positive direction for my (and my fiancé’s) future. Overall the course hasn’t been too difficult which I attribute to my previous programming experience. From the online forums, I know that there are a few people who are doing worse off than me, so I count myself as lucky.

This first class is focusing heavily on C++ and there have been a few stumbling blocks for sure, but nothing I wasn’t able to work out with a little effort. Some of the more new things to me include:

  • named constants
  • c-strings
  • overflow and underflow
  • output formatting manipulators (setprecision, fixed, showpoint, left/right)
  • cin.ignore()
  • the conditional operator (expression ? expression : expression;)
  • switch statements
  • enumerated data types ( enum Roster { Tom, Sharon, Bill, Teresa, John }; )
  • sentinels and flags
  • function protoytpes
  • static variables
  • reference variables
  • overloading functions
  • stubs and drivers

I have really been learning a lot and at quite a fast paces. I’m managing to keep up but I’d be lying if I said I wasn’t worried about next semester. This semester I’m only taking one class, but next semester I am set up to take two, AND my fiancé will be here. I need to juggle all of this while also working full time. It could get tricky. In any event, I’m hanging in there and it feels good to do so.
Seeing C++

My first class at OSU doesn’t begin for another month, so I have started reading the textbook for my first class in the meantime. It’s CS161 – Introduction to Computer Science I. The textbook is Starting Out with C++: Early Objects. It’s my first time learning C++ and it has been a little more difficult to get started with than, say, Python.

For starters, getting an IDE up and running to compile and run C++ code has is not very straight-forward. Often I read that the recommended starting point for C++ is Visual Studio and it is much different from IDEs I have used in the past. With Python, you can just download the latest version and write and run a .py file using the included IDE. But with VS it’s no so easy. It seems to be that:

  • VS is optimized for huge projects, not single-file programs
  • VS student has a command prompt that you can use to run single-file programs, but you need to optimize it with special flags like cl /EHsc /nologo /W4 myProgram.cpp
  • You can also run a C++ program straight from the command line in Unix, again with special flags like g++ -std=c++14 -Wall -Wextra myProgram.cpp -o myProgram.exe
  • You can write a simple batch script to include those code lines and make it easier to run a C++ file
  • In SublimeText (and possibly Notepad++) you can build and run single cpp files very easily, provided that you manage to set up the command line compiler on Windows.
  • Here is an online C++ compiler you can use if you do not need any 3rd party libraries or disc access
  • Some simpler IDEs might be CodeBlocks, CodeLite, and BloodShed
  • Steve recommends Cywgwin and VIM. He says that if I’m not using Visual Studio on Windows, my best be is to just go on Linux. The only languages that work really well on Windows are Python and C#.

#! #! Oh! Oh! Oh! She Moves! She Moves!

In my last post, I mentioned how I was unfamiliar with the #! line found at the beginning of Miguel Grinberg’s run.py script. Here’s what I have learned:

First, it’s called a “shebang” or “hash-bang.” I couldn’t find it on google because google omits special characters. However, I did learn about this awesome search engine that allows them: http://symbolhound.com/

Shebangs are mainly used on POSIX systems (Linux, Unix, etc.) and don’t really mean anything on Windows. However, Python 3.3 and later actually come included with Python Launcher for Windows which recognizes the following shebangs (which all do the same thing):

#! /usr/bin/env python
#! /usr/bin/python 
#! /usr/local/bin/python 
#! python

So what do these shebangs actually do?

Well, according to this thread, they tell the OS to search your $PATH for an interpreter called python, and to run the script using it.

The reason shebangs looks so weird is because they are designed for POSIX systems which have a different directory structure. The #! /usr/bin/env python shebang tells your OS to use the interpreter created in your virtual environment. When you activate an environment:

. . . the environment adds the location of its bin folder to the system path, so that, for example, when you type python you get the environment’s version and not the system’s one.

However, according to this StackOverflow thread:

A bin directory is created on POSIX systems only . . . Some paths within the virtualenv are slightly different on Windows: scripts and executables on Windows go in env\Scripts\instead of env/bin/ and libraries go in env\Lib\ rather than env/lib/.

And finally:

In Unix, an executable file that’s meant to be interpreted can indicate what interpreter to use by having a #! at the start of the first line, followed by the interpreter (and any flags it may need).

If you’re talking about other platforms, of course, this rule does not apply (but that “shebang line” does no harm, and will help if you ever copy that script to a platform with a Unix base, such as Linux, Mac, etc).

. . .

Using env gives maximum flexibility in that the user can select the interpreter to use by changing the PATH.

Finalizing Flask

Ok, I just wanted to make sure I got this flask thing figured out. Here’s what I did and what happened when I did it.

First I made a directory to house my test site. It’s as follows:

c:\code\test\mysite

I then enter that directory to make sure any commands I do take place within it. I need a virtual environment to house Flask. When I install Flask, I don’t want to do it system-wide. This part was pretty simple too:

virtualenv venv

(Remember, the venv at the end is just the name of the directory the virtualenv will be installed into. You can actually name it anything you want, but  venv is standard practice.) After creating the virtual environment, I need to enter it. I do this by running the activate script in the Scripts sub-directory:

venv\Scripts\activate

The prompt now changes to show that the virtual environment is active. If I wish to exit the virtual environment, all I need to do is type deactivate. Finally, I need to install Flask into the virtual environment using pip. This is quite simple:

pip install flask

Boom! All done! Flask is installed into a virtual environment and ready to use. I should note that the file structure here is different from the one noted in Miguel Grinberg’s Flask tutorial. Miguels says that the file structure should look like this:

microblog\
    flask\
        <virtual environment files>
    app\
        static\
        templates\
        __init__.py
        views.py
    tmp\
    run.py

But I find that mine looks like this:

mysite\
    venv\
        include\
        Lib\
            __pycache__\
            collections\
            distutils\
            encodings\
            importlib\
            site-packages\
                flask\
                <other packages>
        Scripts\

I can think of a few reasons why this might be. For starters, this entry was last updated in September 2014. About a year ago. Flask may have changed a lot since then. Another reason for the difference might be that I’m doing this on Windows and Miguel was doing it on Linux and they change things between systems. I will have to investigate this more and find out why there are discrepancies.

EDIT: Aha! I found one of the discrepancies! In the tutorial, Miguel uses the command virtualenv flask instead of virtualenv venv. That would explain why he has a folder titled “flask” in his microblog directory.

Here’s the purpose of the other folders he created:

The app folder will be where we will put our application package.
The static sub-folder is where we will store static files like images, javascripts, and cascading style sheets.
The templates sub-folder is obviously where our templates will go.

And here are the files that he created:

__init__.py

from flask import Flask

app = Flask(__name__)
from app import views

The __init__.py file’s purpose is to create the application object (of class Flask) and then import the views module. The views are the handlers that respond to requests from web browsers or other clients. In Flask handlers are written as Python functions. Each view function is mapped to one or more request URLs.

views.py

from app import app

@app.route('/')
@app.route('/index')
def index():
    return "Hello, World!"

The function in the views.py file just returns a string, to be displayed on the client’s web browser. The two route decorators above the function create the mappings from URLs / and /index to this function.

run.py

#!flask/bin/python
from app import app
app.run(debug=True)

The run.py script starts up the development web server with our application. It imports the app variable from our app package and invokes its run method to start the server.

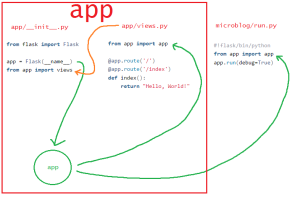
Finally, I should mention that I am a very visual learner, so the following drawing is my understanding of what’s happening when you enter flask\Scripts\python run.py:

what's going on

Just a final note on the __init__.py file: The __init__.py file makes Python treat directories containing it as modules. Furthermore, it is the first file to be loaded in a module, so you can use it to execute code that you want to run each time a module is loaded, or specify the submodules to be exported. It allows you to define any variable at the package level. Doing so is often convenient if a package defines something that will be imported frequently.

EDIT: One more thing! The first line of the run.py file was enigmatic for me. I finally found out that it is a shebang line. I’ll have to do more research on its purpose.

Accepted into OSU!

Last Friday I was officially accepted to OSU’s Online Computer Science Post-Baccalaureate program!

Here’s a little bit more information about their Ecampus from the new student orientation:

Oregon State Ecampus is consistently ranked among the nation’s best providers of online education. Through our comprehensive online degree and certificate programs, Ecampus provides learners with access to a high-quality OSU education no matter where they live. All Ecampus courses are developed by experienced OSU faculty who use innovative course delivery strategies. And all Ecampus graduates receive the same transcript and diploma as Oregon State’s on-campus students.

In each of the last four years, Ecampus has been top-ranked nationally by several independent publications based on rigorous criteria, including academic quality, student support, faculty credentials, student satisfaction and degree selection diversity.

Ecampus currently delivers 20 undergraduate degree programs, 22 graduate programs and more than 900 online classes online. We partner with nearly 600 Oregon State faculty annually, and more than 15,000 individual students took one or more Ecampus class in 2013-14. Nearly 2,000 students located around the world have earned an OSU degree online since 2002.

Giving Virtualenv Verisimilitude

While learning Flask, one of my biggest challenges has been wrapping my head around how virtualenv works. This blog post is really just to lay out my basic understanding of how it works. One of my main sources of information has come from this fantastic blog post by Jamie Matthews.

Here’s some of the more important points that needs to be understood before understanding virtualenv:

  • pip is a tool that installs packages from the Python Package Index (aka PyPI; the Cheeseshop).
    • PyPI is an online repository with over 60,000 packages included in it. Whenever you use pip to install a package, it gets the package from here.
  • pip, by default, installs packages to Python’s site-packages directory. Anything installed in Python’s site-packages directory can be imported by any of your programs.
  • virtualenv creates a complete copy of everything needed to run a Python program, including a copy of the python binary itself, a copy of the entire Python standard library, a copy of the pip installer, and (crucially) a copy of the site-packages directory

How do you install virtualenv?

  • For Windows: make sure that your Path is set to access commands from your Python directory, or alternatively, just navigate to your Python directory.
  • Run pip install virtualenv

How do you setup an environment?

  • Change your directory into the root of your project directory, and then use the virtualenv command-line tool to create a new environment:
    • virtualenv venv
    • The env part is just the name of the directory you want to store the environment in. You can change venv to anything, but it is standard practice to keep it named venv
    • One of the folders created by virtualenv is called Scripts. Some scripts are created in this folder when you first created your environment. Of note are the activate and deactivate scripts. Run these to activate and deactivate your environment.
    • Cool note: you need to specify the path when you run activate (by entering something like: c:\myProject\env\Scripts\activate) but you don’t need to specify the path when you run deactivate – running activate makes the association for you. Convenient!

Here are some other resources on basic virtualenv functionality:

And if you are interested in virtualenv with PythonAnywhere, these threads might help as well:

Hello World!

This post is just a quick reflection after finishing part 1 of Miguel Grinberg’s Flask Mega Tutorial.

If you are using Python 3.4, to install a virtual environment for Flask, you only need to run $ python -m venv flask.
You don’t need to run$ virtualenv flask. Using virtualenv is… tricky. I’m still not quite sure how it works. I think the author doesn’t go into enough detail for a beginner who has never used virtualenv before. However, I have a general sense of how it works. It seems that if you navigate to the /Scripts sub-directory of your project, you can activate the virtual environment by running $ activate. You can confirm that the packages/extensions you wanted are installed correctly by typing $ pip freeze or  $ pip list while virtualenv is activated. If you try these commands outside of your environment, you will see what is installed into Python’s core. I did get the server to work and disply “Hello World!” so its a start I guess. I just hope the rest of the tutorial isn’t so convoluted as the initial installation part. It doesn’t help that I’m also learning how to navigate PyCharm at the same time.

In other news, I’m waiting for my transcripts to arrive at OSU before they can give me a verdict on my application.

Apply Yourself!

After a lot of careful consideration, I have decided that if I seriously want to turn my programming hobby into a programming career, I need to go back to school for a computer science degree.

I have weighed the pros and cons of a second bachelor’s versus a master’s and have decided that pursing a second bachelor’s in CS is my best bet to become a well-rounded programmer. One of my biggest concernshowever, was the time commitment required. I work full time and will only be able to study at nights and on weekends. Fortunately, I seem to have found my salvation in Oregon State University. They offer an online, post-baccalaureate degree in computer science. This program was made for people who received their bachelor’s in another field and want to branch out into CS. In other words, for someone like me. The program is very flexible, allowing students to study at their own pace. Students can complete their degree by following a one, two, three, or four year track. I’m hoping to get it done in two years. Also, check out this quote from OSU’s website:

This program in computer science is the only one in the nation that offers a bachelor’s degree online for post-baccalaureate students.

Yes, you read that right. It’s a real degree, done entirely online, and they are the only one offering it. The program even has an entire subreddit dedicated to it. I just finished applying online and classes start September 24th. It is a tad on the pricey side though. I’ll post back later when I hear a verdict on my application. Fingers crossed!

In other news, I’ve put Ruby on the shelf for the time being so that I can become more proficient flaskwith Python. Right now I am working on learning Flask but before I get too deep into it, i’m trying to better understand the boiler plate code that it requires. This has lead to me learning about “special (aka ‘magic’) methods” in Python, as well as Python decorators. Luckily, I’m a little familiar with decorators as I attended a presentation on them last Tuesday, hosted by The Boston Python User Group. I want to go to more of their events but unfortunately they are usually on Tuesday nights and I have to work at that time. Bah.

In any event, I’ve found that this Stack Overflow explanation is the most helpful by far. For the general Flask tutorial, I am currently using this one, however I noticed that he doesn’t use a virtual environment to setup Flask like most other tutorials do. I worry that may have some adverse effects. I’ll have to search around and find out!

One Foot in Front of the Other

Recently, I have been pondering what to do to further my growth as a developer. Here are some of my current thoughts on what to start doing in the near future:

  • I should get more practice using Git and working in a group. I think that I should start a small Python project with someone to get more Git practice. (I also recently found a helpful page for remembering the main points of Git.) EDIT: Someone just linked me to this tutorial for learning to use Git better.
  • Start using a fully-fledged code IDE like PyCharm or Spyder
  • Checkout the interactive browser-based IDE IPython
  • Host my own Python server for $5/month on PythonAnywhere.com
  • Learn Flask (which is supposedly easier than Django)

In other news, I recently purchased two books on Amazon that should be arriving later this week:

I also started studying Android development on Treehouse. Having a program developed for Android is great because at an interview I will be able to show employers a project simply by taking out my phone.

The Data General Eclipse MV/8000

I’ve also been reading The Soul of A New Machine by Tracy Kidder. It won the Pulitzer Prize and is the story of the Data General Corporation trying to create a new 32-bit minicomputer in the 1970s. It really shows the high-paced world of computer-development at the time and the people then who lived purely for the challenge of inventing and creating something radical and new. The machine they went on to create would be the Data General Eclipse MV/8000.

Taylor's Blog © 2015