Taylor's Blog

Atypical ramblings

Some musings on things

In Andrew Hunt and David Tomas’ classic The Pragmatic Programmer: From Journeyman to Master, they write about a phenomenon known as “start-up fatigue.” It’s the idea that nobody wants to start a new project. New projects are full of unknowns. They are daunting. For whatever rewards and they promise at the end, the road to those rewards has the potential to drag on towards infinity, sapping you of all your time and energy; potentially becoming an inescapable black hole that is forever dragging you down and offering no respite. Everyone fears that first step into the unknown, yet many people are much more willing to join a project that is already an ongoing success.

In a recent thread on /r/learnprogramming, the OP wrote of pitfalls made by beginner programmers. To my disdain, I found that his caricature of what I dub “the poser programmer” hit awfully close to home. In his words:

The first is something I call the “infinite tutorial loop.” The aspiring programmer goes from tutorial to tutorial, never breaking out and building something independently. I’ve seen cases where someone has been coding for less than a year and they are, frankly, more skilled and more knowledgeable than someone who has been doing it for five. This isn’t because they’re more intelligent or putting in more time — it’s because they’ve been pushing themselves out of their comfort zone, stretching themselves, and building applications and picking up necessary skills along the way. Meanwhile, the other person has been spending their time going through 75 introductory react courses on Udemy. One has an upward trajectory; the other is stuck in a loop.


The second is simple: the individual does everything related to coding that doesn’t involve writing code. They attend every meetup. They share relevant content on LI daily. They’re subscribed to every subreddit. But they’re never actually creating anything. Zero green squares on GitHub.

/u/KovyM

As sad as it is to say it, I feel this describes me lately. I have been inert; constantly telling myself “after I finish this tutorial I will be able to build something!” But either the tutorial is never finished, or I decide that I actually need one more tutorial in order to start a project. Repeat ad nauseam.

Finally, I find that my inability to create literally anything stems from a multitude of factors:

  • Start-up fatigue. I’m afraid to begin anything for fear of it never being finished, being a waste of my time, or both.
  • Stuck in an infinite-tutorial loop. I’m never good enough. I need the validation of having finished some guide in order for me to begin anything. Otherwise, I’m not qualified enough to do whatever hacking-around I am attempting.
  • Project paralysis. I feel like I need to work on something significant. I constantly tell myself that building a to-do app is somehow beneath me. I can’t just start on any old project idea, it has to be a good idea. Not only that, but I need to write it in the correct language, and using the proper framework. In essence, I am setting my standards too high.

Where does this leave me? Through some rigorous self-analysis, I can make the following conclusions. For starters, I am conscious of my faults. This is a good thing. I know what my personal pitfalls are and I can work to avoid them. Not only that, but I can prepare a plan to get around them and to make myself more productive. I have been kicking around some ideas lately, but haven’t settle one one yet. I guess I am using this blog post to help me layout a plan forward.

I have been considering starting 100DaysOfCode. I feel that my skills are slipping because these days I spend so much time reading about code and so little time actually writing it. If you want to become a better runner, you don’t read about running, you go out and run. If I do start 100DaysOfCode, I feel that this blog might prove to be the best outlet for my progress. I even ran across a journal in a bookstore the other day with a great layout that I might attempt to emulate.

I think above all, the biggest change I could make to myself is to start living out a little personal mantra I came up with recently. It’s not complicated, but I think If I could live this mantra a little bit more in my day-to-day life, I would be a lot better off. Here it is:

Think less; do more!
Welcoming the delegates

I have started working through The Art of Unit Testing by Roy Osherove and came upon this test that took me a while to understand:

[Test] 
public void IsValidFileName_EmptyFileName_Throws()
{
    var ex = Assert.Catch<Exception>(() => la.IsValidLogFileName(""));                 
    StringAssert.Contains("filename has to be provided", ex.Message);
}

I was really confused about what was happening on line 4. Looking at the NUnit documentation, I saw that this is format for the Assert.Catch method:

T Assert.Catch<T>(TestDelegate code);

The method is going to return an exception, but it needs to be passed a TestDelegate first. We can see the syntax for a TestDelegate here:

public delegate Void TestDelegate ()

This seems strange because according to the code, Assert.Catch is being passed a lambda expression:

() => la.IsValidLogFileName("")

Well it turns out that Lambda expressions are a simpler syntax for anonymous delegates and can be used everywhere an anonymous delegate can be used. The Microsoft docs even say as much:

a lambda expression is just another way of specifying a delegate

The question is then, “what is a delegate?” From my research, a delegate is used in C# when you want to pass a function itself as a parameter. You often see people refer to a delegate as “a pointer to a function.” The syntax for creating a delegate is as follows:

<access modifier> delegate <return type> <delegate_name>(<parameters>)

And here is some example code using a delegate:

 class Program
 {
     public delegate void Print(int value);

     static void Main(string[] args)
     {
         Print printDel = PrintNumber;

         // or you can do this:
        // Print printDel = new Print(PrintNumber);

        printDel(100000);
        printDel(200);

        printDel = PrintMoney;

        printDel(10000);
        printDel(200);
    }

    public static void PrintNumber(int num)
    {
        Console.WriteLine("Number: {0,-12:N0}",num);
    }

    public static void PrintMoney(int money)
    {
        Console.WriteLine("Money: {0:C}", money);
    }
}

And here is the output:

Number: 10,000 
Number: 200 
Money: $ 10,000.00 
Money: $ 200.00 

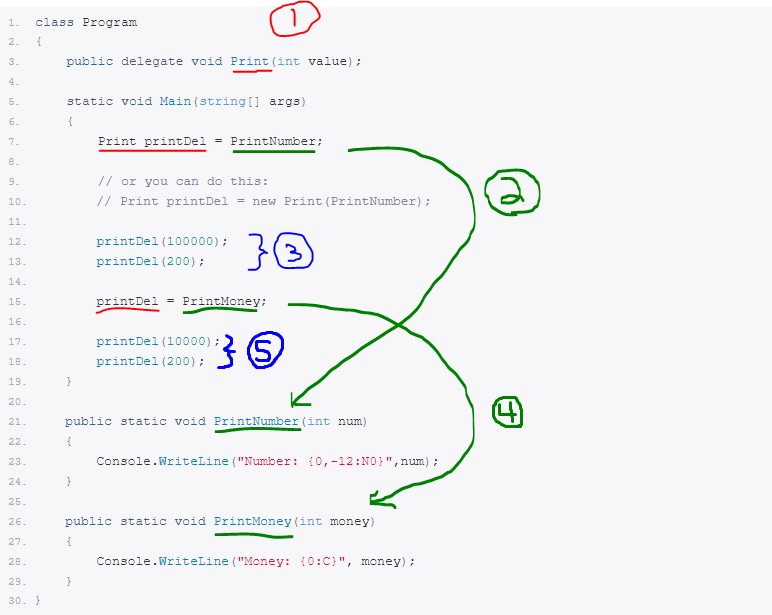
Let’s understand what’s happening here.

  1. We are declaring a delegate called Print that takes an integer as an argument. We create a new instance of this delegate can call it printDel.
  2. We point printDel at the PrintNumber function.
  3. We call our delegate twice, passing it in two different values. It formats the numbers appropriately with commas as specified in the PrintNumber method.
  4. We then point printDel at the PrintMoney function.
  5. We call our delegate two more times and this time it formats the numbers for currency as described in the PrintMoney function.

So, in summary, if we use a delegate, we’re passing a pointer to chunk of code, whereas if we use a lambda, we’re passing the code directly (and anonymously). Lambdas are more convenient in this case because we don’t have to declare them or even give them a name.

The 2012 Rails Hack of GitHub

As I am learning Ruby on Rails, I am finding interesting tidbits in relation to it’s history. This one was brought up in a recent HackerNews thread about GitHub updating to Rails 5.2:

So back in 2012 rails had a default behavior where you could mass assign values from a POST to a user and there wasn’t any scrubbing of that, by default. Egor Homakov realized this was a Bad Thing and issued a pull request that would have fixed it. Instead of accepting the pull request, the Rails repository admins said something along the lines of ‘competent programmers would not leave that setting in place’ and rejected the pull request.

Homakov thought about this and tried it against GitHub, which was known to run on Rails. The code worked! In theory, he could have manipulated the permissions on GitHub to get access to the Rails repository where he would then be able to reopen and accept his own pull request.

Instead, he just chose to push a simple commit to GitHub’s master branch in order to prove his point.

GitHub temporarily suspended his account while they launched an investigation, but after finding Homakov to be in the right, had it reinstated.

Some links related to this:

  • link 1 – Detailed explanation about how Homakov’s hack worked.
  • link 2 – GitHub’s official response to the hack
  • link 3 – HackerNews thread after the hack took place


Thoughts about Hackathons and Hackers

First, happy Programmers Day!

I was in an IRC chat today discussing the idea of hacking with some fellow programmers. In my opinion, modern hackathons are too focused on end-goals. Most hackathons have challenges you are expected to try to complete, or at the very least a theme that restricts the realm in which you can work. Pessimists might say that company-sponsored hackathons are a cheap way for corporations to out-source new ideas for their industry.

Here’s a quick anecdote about my first ever hackathon. It was BostonHacks 2017 and my group made the conscious decision to not try and compete for prizes through solving a given challenge, but to instead create something fun using tools we were interested in. We ended up creating an app that would call your phone every time someone tweeted and read the tweet out loud to you. We called it “Spitter” because it “spoke twitter”. During its creation, we learned to use two APIs we had never touched before (Twitter and Twilio) and were extremely proud when it came time for us to present it to the judges. Take a look at how happy we were in this photo:

Posted by Major League Hacking on Tuesday, May 2, 2017

I will never forget the Judges reaction. They wore an extremely puzzled look on their faces as they asked “who will you market this to?” We didn’t really have an answer, because it wasn’t really something we ever thought was marketable. The judges couldn’t wrap their heads around the fact that we had created something merely to see if we could, and we were equally befuddled by the fact that they felt our project had to have a purpose.

We ended up making up some bumbling explanation that it could in theory be a useful tool for the blind. Suffice it to say we did not win any of the competitions that day.

In Steven Levy’s book Hackers: Heroes of the Computer Revolution, he explains that the origin of the word “hacker” can be traced back to 1959 where it had an entry in the MIT Tech Model Railroad Club‘s dictionary. The TMRC is famous for being an incubator of sorts to some of the first notable hackers in modern times. The entry for the word in the club’s dictionary is as follows:

hack (noun)
1. an article or project without constructive end
2. a project undertaken on bad self-advice
3. an entropy booster

hack
(verb)
to produce, or attempt to produce, a hack

hacker (noun)
one who hacks, or makes them

In this article written by Richard Stallman, he gives his take on the word:

It is hard to write a simple definition of something as varied as hacking, but I think what these activities have in common is playfulness, cleverness, and exploration. Thus, hacking means exploring the limits of what is possible, in a spirit of playful cleverness. Activities that display playful cleverness have “hack value”
. . .
Around 1980, when the news media took notice of hackers, they fixated on one narrow aspect of real hacking: the security breaking which some hackers occasionally did. They ignored all the rest of hacking, and took the term to mean breaking security, no more and no less. The media have since spread that definition, disregarding our attempts to correct them. As a result, most people have a mistaken idea of what we hackers actually do and what we think.

I find it interesting how the original meaning of hacker eventually got twisted to refer to someone who subversively enters restricted systems, but now with the rise of hackathons, it seems that the word is being brought back to its original meaning. Hackathons generally seem to regard hacking as a close parallel to what people do in the “maker” culture.

Another view on the term comes from this article from 2004 by Y Combinator and HackerNews founder Paul Graham (who, according to Wikipedia, Steven Levy refers to as a “hacker philosopher”). Here are a few choice snippets:

It is by poking about inside current technology that hackers get ideas for the next generation.
. . .
Hackers are unruly. That is the essence of hacking. And it is also the essence of Americanness. It is no accident that Silicon Valley is in America, and not France, or Germany, or England, or Japan. In those countries, people color inside the lines.
. . .
Hackers are invariably smart-alecks. If we had a national holiday, it would be April 1st. It says a great deal about our work that we use the same word for a brilliant or a horribly cheesy solution. When we cook one up we’re not always 100% sure which kind it is. But as long as it has the right sort of wrongness, that’s a promising sign. It’s odd that people think of programming as precise and methodical. Computers are precise and methodical. Hacking is something you do with a gleeful laugh.

I guess the point of this post is that I would love to see more hackathons that take hacking back to its roots — just hacking for the sake of hacking. To me, the process is what is most important, not the end result.

I am happy to see that there is at least one hackathon that has this mentality: The Stupid Shit No One Needs & Terrible Ideas Hackathon. Some great ideas (re: hacks) have come out of that group including:

  • Zen Volt — A meditation aid that shocks you when you don’t relax.
  • NonAd Block — a chrome extension that blocks all web content that isn’t an ad.
  • VR Fireplace — a virtual reality experience where you look at a fireplace on a TV.

If those aren’t quality hacks, then I don’t know what is.

Automatically Downloading XML from Chrome

I recently was given the task of gathering data from several xml files that were automatically generated based on search queries. After going through the first few files, I realized that my current process was quite inefficient. I started by clicking the link to the xml data, which would then render inside of Google Chrome. It looked something like this (although the actual xml files were much longer):
I would then use ctrl+f to look for the piece of data I needed. This was a painfully slow process, as I had to find a lot of data, and often the xml nodes had the same names but in different places. This lead to a lot of wasted time double and triple-checking that the data I was looking at was the correct data. I figured there had to be a better way.

It was about this time that I learned about XPath, which I figured could do a lot to speed up the process. Unfortunately, Chrome’s default xml viewer doesn’t support XPath, so I figured there must be a plugin out there that does. I started by trying out the XV XML Viewer plugin, but it seemed to still be in slow development and the XPath support was really lacking. In addition, it made it difficult to copy+paste XML as that feature had been disabled in a recent release. I also learned about the excellent plugin ChroPath which supports XPath, but really only for DOM manipulation. It didn’t work very well on the XML pages rendered in Chrome.

After spending a lot of time trying out various Chrome plugins, I remembered that VS Code has XPath functionality built right into it. Now all I needed to do was open the file in Chrome, copy+paste it into VS Code and I could use XPath to my heart’s delight… except that when you copy+paste from Chrome, it includes all of the HTML Chrome adds to display the XML, and you have to spend extra time removing it all. Ugh.

I tried to see if there was a way to get Chrome to display XML as plain text, instead of rendering it inside an HTML document. I couldn’t find one. The only alternative was to right-clicking the document after it loaded and save it to my desktop. This annoyed me because I would rather Chrome not open the file at all and just download it straight-away. After lots of research online, I finally figured out how to enable this functionality.

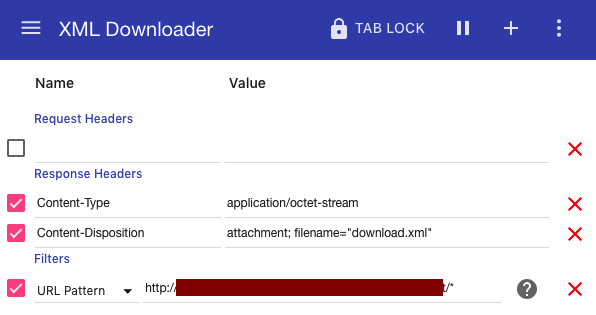
First, I needed to intercept the HTTP response from the server change the variables in the header so Chrome wouldn’t know that it was receiving an XML document. I also had to inform Chrome that this file should be downloaded, and that Chrome shouldn’t attempt to open it. To do this, I downloaded the plugin ModHeader and gave it the following settings:Now whenever I encountered a file with a Content-Type of xml on that specific domain, ModHeader would intercept its response header and change it to application/octet-stream which is sort of just a generic type. It would then label the file as an attachment which means it is to be downloaded, and give it a file name. Voilà! Files automatically downloaded!

Next I told Chrome to just open .xml files automatically with my system’s default program, and they show up instantly in VS Code! I can now access XML files and run XPath searches on them instantly and am able to save a ton of time. Good stuff.

Summer’s End Update

I am back into the swing of things with school next week. This semester I will be taking CS261: Data Structures. Our teacher was kind enough to release the first week content early and I have been doing my best to go through it all before class starts for real next Wednesday. I had a little trouble wrapping my head around the basics of algorithm analysis in the beginning, but the more I study and review, the easier it comes. I am feeling a bit more confident about the class than I was two weeks ago.

I have also taken a break from my Spring studies as well. I had been doing the Udemy course for over a month at this point and was getting a bit burnt out. There’s really a lot to learn and the course is a bit slower paced – which can be both a blessing and a curse. I was really getting exhausted with not having any real solid apps built with the amount of time I had put into it.

With that in mind, I have decided to go back and revisit my roots with Node.js. I realized that my ultimate goal was to get some apps built to showcase my skills as a developer. With Node, I feel that I can get something up with a lot less work than with Spring. I also had a lot of fun working with Node in my Web Development class. I made my final decision when I came across this Reddit thread that was filled with comments that really resonated with me:

I use spring on the job everyday, but in my side projects I always use node/express. Besides the fun factor, restarting a node server is painless, and your code base should be significantly smaller.

Node.js is more cutting edge and will have less development time. For me, it’s just a hell of a lot more fun.

The one thing I noticed in that thread was how often people equate Node.js with fun. That’s really important to me. Creating a personal app should be something I enjoy doing, otherwise I will be less likely to complete it.

After I had made my decision to go back to Node, I needed a plan. That’s when my friend Tom came to me with a problem. Tom is a big video game collector. He has tons of classic video games and he often goes out shopping to buy more. His problem was that when he’s out, he doesn’t remember what games he has, so he’s often buying a duplicate of a game he already owns. He needs an app that he can use to store and review his video game collection with. I liked this project idea because I could easily see what components I would need to wire together:

  • The app needs to connect to a database to store info about what games he has or doesn’t have. I can focus on making a simple CRUD app and doing it in a RESTful way.
  • The app needs to have a login screen for different users – something I have never created before but would be valuable to learn how to do.
  • The app should look good. In the past, all my web apps have been just straight HTML and CSS. I decided I should learn a design toolkit and naturally chose the most popular one: Bootstrap.
  • The app should be able to connect to an existing API to look up information about the games in your collection. Luckily one already exists: The Internet Game Database.
  • At some point, we decided it would be really awesome if he had a phone app with a barcode scanner that would allow him to just scan his games and automatically add them to the database. Awesomely enough, Google has a Barcode API for Android that does just that.

So with all of those things in consideration, I had a relatively good idea of what I needed to learn. After doing some scouting around, I found the holy grail of tutorials: The Web Developer Bootcamp by Colt Steele. It’s one of the most popular tutorials on Udemy and it is awesome. I am already over halfway through it and I have learned a ton. There was a lot of stuff in their I had already learned but served as a good review anyway. The only comment I have about the course is that it uses Bootstrap 3. I didn’t want to be left out so I also picked up another awesome course: Bootstrap 4 from Scratch with 5 Projects by Brad Traversy.

Together, I feel these two course will give me almost all I need to create this app. So far I’ve been able to balance my coursework with my self-study, and hopefully I will be able to keep it up once school starts for real next week.

Lastly, I read a humorous article recently titled How it Feels to Learn JavaScript in 2016. It’s really funny, but one of the greatest takeaways I had from it was this comment from Addy Osmani, Senior Staff Engineer at Google. It’s a long one, but it really is just that good and something I think will to revisit in the future when I get frustrated by all the materials out there:

Totally get your frustration 🙂

I encourage folks to adopt this approach to keeping up with the JavaScript ecosystem: first do it, then do it right, then do it better.

First do it: Take a breath and acknowledge that you’re totally new to a space. It’s okay not to use everything. In fact, it’s better if you don’t. Get a simple prototype built that does the trick. Nothing wrong with straight-up using HTML/CSS/JS.

We don’t acknowledge enough that it takes time, experimentation and skill to master the fundamentals of any new topic. Beginners shouldn’t feel like they’re failing if they’re not using the library-du-jour or reactive-pattern of the week. It took me weeks to get Babel and React right. Longer to get Isomorphic JS, WebPack and all of the other libraries around it right. Start simple and build on that base.

Then do it right: Iterate. Improve on what you’ve got. See a problem that you keep having to solve? Maybe layer in a small library/module to help with it. There is zero reason to be worrying about rewriting your project in another language or framework nor adopting any more tooling unless it helps you move the needle forward on your project. Everything you add to your project should really be offering value. If it’s complicating things or making it harder for you or your team to get a job done, get rid of it.

Then do it better: master your craft. Once you’re comfortable navigating the waters of the tools and libraries you know for sure add value to your workflow, you’ll find that including them as a default “just make sense”. I’m heavily using 9–10 different tools in my project these days but I’ve learned enough about how to avoid their rough edges that they save me time. I would never suggest a beginner use most of the things in this post right off the bat. It’s a recipe for pain. Instead, get the basics right. Slowly become familiar with tools that add value and then use what helps you get and stay effective.

It’s also worth noting: everyone — even the people writing the tools and libraries mentioned in this post — go through the same feelings of fatigue and frustration learning, debugging and staying up to date with modern JavaScript. I’d encourage folks to remember we’re all in the same boat and our tools are here to help us. If they’re not doing that, we should get them out of the way 🙂

Phase 1 Complete!

I have been making some serious progress towards development of my app. Last night I was lying in bed configuring my Linux server on my phone with JuiceSSH and managed to get Tomcat set with Spring Boot. I was able to display a simple “Hello World” message when I visited 104.131.74.25:8080 which is a huge step forward. Doing so took a good amount of configuring however. Here are some of the challenges I faced just to get this far:

  • I was dead-set on using IntelliJ IDEA to setup Spring as I prefer it to Eclipse. However, in order to have Spring baked into IntelliJ by default, you need to have the IntelliJ Ultimate which is $12/month or $50/year. Luckily, because I am still a student at Oregon State University, I am able to use IntelliJ for free! Score!
  • I followed this video for instructions on how to set up a simple “Hello World” using Gradle and IntelliJ. It worked on localhost and I attempted to port it over to my server by just copying the whole directory over. I would later learn that this is not the proper way to do things.
  • Once I had ported over my project, I installed Tomcat, Gradle and Spring. However, I had issues with Gradle and Spring because their versions were too old to be compatible with my Tomcat installation, so I had to manually download the latest versions from the companies’ websites. I learned a valuable lesson in this – you can’t always trust the package manager for the latest version of software.
  • I was finally able to get the server up and running by typing gradle bootRun in the project directory! Victory… or so I thought!
  • A very helpful redditer informed me that my setup was erroneous. Here’s the advice he gave me:

You should be building a .jar (locally or somewhere else) and then uploading that jar to your server. You really shouldn’t be using gradle to run your application on the server. gradle bootRun is just an easy way to get your app running locally for development purposes.

You can build a .jar locally using ./gradlew build 

Then you will find a .jar file in build/libs/ that you can upload to the server.

You also need to run your app as a service. Simply executing the app on the command line like you are doing is great for local devlopment, of course, but it won’t work on a server. In fact, as soon as you cntrl+c or disconnect from the server, your app will shut down. This is why you need to run it as a service.

Thankfully, doing this with spring boot is actually pretty easy even if you aren’t very familiar with linux: https://docs.spring.io/spring-boot/docs/current/reference/html/deployment-install.html

That documentation gives you two methods, init.d and systemd (don’t worry too much if you don’t know what those mean right now). You probably want systemd unless your Debian is an older version that doesn’t support it (in which case use init.d).

Essentially what spring boot does it allow you to build a fat jar that is also an executable that can be run as a Linux service. You then create a configuration file (/etc/systemd/system/yourApp.service) where you point to that fat jar, and in that file you can also control stuff like where your output will go.

Once you do that, you can start your app like:

systemctl start yourApp.service

You’ll notice it will give you back the console and run the app in the background. You can see your output in various ways (look at the documentation, usually a file somewhere in in /var/log).

You can also “enable” the service

systemctl enable yourApp.service

This will make it start up automatically whenever the server starts up or restarts.

I followed his advice and the documentation he linked me and managed to get things working. This required me to add code to my build.gradle file and to run gradlew build to get a .jar file. I copied the .jar file over, created a .service file and started the service with sudo systemctl start myapp.service. I had to fix some errors with the service as it wouldn’t start right away which included making the .jar executable by typing chmod +x /var/myapp/myapp.jar . I also learned:

  • To see what services are running with the systemctl list-units command
  • To see details about a service using systemctl status -l myapp.service.
  • To see what ports are being listened on so I can make sure Tomcat is running using sudo lsof -i -P -n | grep LISTEN.
  • To restart a service, use sudo service myapp restart

I learned a lot setting this up, but now I get to move on to the fun part of linking the app to the back-end. I am looking forward to it!

I Could Use Some REST

One of the areas I’ve been trying to improve in is my familiarity with enterprise environments. My dev friend Pete gave me this advice:

Pick some tech and do a “full stack” project. Doesn’t have to be big. Hell, it can be a website that keeps an inventory of what games you own. Nothing more than a CRUD interface to a DB. But being able to point to a project that shows that you have your toes dipped in all aspects is great if you’re just getting your feet underneath you. I wouldn’t worry too much about stuff being “enterprise.” 99% of enterprise coding is “take data from this thing, and put it in this other thing.”

If you’re looking for a project, create an app that connects to “the cloud.” Put it behind an API and do a web interface and app to interact with it. Most apps that aren’t a game are simply a native way to interact with some remote API. It’s MUCH easier to edit a page or DB entry than push out an app update.

Make an app that does hello world when you do a GET on /helloWorld. Do another app that you can POST some JSON payload to /helloworld/name with an ID. Then when you do GET at /helloworld/{ID} it says “Hello $NAME”

So to get myself better acquainted with new technologies, I’ve given myself a new project. I’m going to create an Android journal app. Users can write a note and submit it, and the app will save their note on a remote database. I plan on it having some sort of login and authentication which is something I have not done yet. I also plan on people being able to read other people’s posts. So it will be a bit like a simplified message board.

I’ve taken advantage of the GitHub Student Developer Pack which entitles me to $60 credit at DigitalOcean which I’m using to host a Debian server to will house my back end. Naturally, the front end will be written in Android Studio and I’ve been looking into the Volley HTTP library to send my GET and POST requests. This video has been very useful in helping me to Volley set up. On my server, I’ve gone ahead an got MySQL server up and running with help from this guide. To make sure the database was set up correctly, I connected to it using MySQL Workbench (I found it easier to configure than Microsoft SQL Server Management).

The next big decision I had to make was what framework to use to connect my app to the database. When talking with Pete, he opined:
I think decision paralysis really hinders beginning and junior developers. Too much time is spent trying to find the perfect framework when we don’t have the experience to really understand the pros and cons. That time is much better spent learning about using frameworks and what problems they solve.
With that in mind, I think I will trying going with Spring. I’ve looked at this getting started guide and it seems pretty straight-forward. In addition, Spring uses Java which is what I’m trying to improve on for Android in general, so it should give me some extra practice. Also, Pete mentioned that many enterprises use Spring, so it would probably be good to have on my resume.

One challenge I’ve had is setting up my development environment. In particular: how can I work on files using an IDE if they are stored on a remote Linux server? Fortunately, I learned about Win-SSHFS and thanks to this awesome guide, I was able to quickly set it up and access remote files on my Windows machine.

So far, things haven’t been to bad. It’s mostly been a lot of configuring. Next I’ll be installing Spring onto my server and following the aforementioned getting started guide to get it set up.

Android SDK for IntelliJ IDEA

This morning I’ve been attempting to get LibGDX working with the IntelliJ IDEA IDE as described in this tutorial. However, I quickly ran into a problem. In the instructions it says the following:

Install the latest stable platform via the SDK Manager.

Sounds all well and good, but imagine my surprise when I find out that Google removed the SDK Manager GUI which is really confusing since every tutorial on the web still instructs you to use it. After some poking around, I discovered that you can either download Android Studio (which I’d rather not since it takes up a lot of space) or download the Android Command Line Tools. Problem solved? Well, not quite. Once again, I ran into some inconsistencies with documentation that was available and how the tools actually responded. Everyone online mentions how you need to use the android command in the command line to install packages, but in fact this command has been deprecated. Now we need to use the sdkmanager command instead.

Ok then, well according to the sdkmanager documentation, I just need to run sdkmanager.bat --list to see all available packages right? Wrong! According to this StackOverflow thread, you’ll get an error where the sdkmanager can’t move away the tools folder. So instead you need to follow user ahasbini’s advice:

copy the tools folder to another place (let’s say C:\temp\). Then direct into the C:\temp\tools\bin\, open the cmd prompt there and run your update commands as such:

sdkmanager.bat --sdk_root=sdkRootPath --command

Where sdkRootPath is path to your original SDK folder (C:\testinstall\sdk\). Once that is done, delete the C:\temp\tools\ copied folder.

Yeesh. What a bunch of work for something that should have been so simple! I feel that Google had only left the SDK Manager GUI intact, we wouldn’t have to go through all of this!

Well, anyway, here’s what I had to do to get the the thing working:

  1. I installed a some Android packages using the following commands (not sure if all of them are necessary):
    sdkmanager.bat --sdk_root=C:\testinstall\sdk\ "platforms;android-25"
    sdkmanager.bat --sdk_root=C:\testinstall\sdk\ "sources;android-25"
    sdkmanager.bat --sdk_root=C:\testinstall\sdk\ "build-tools;25.0.3"
    sdkmanager.bat --sdk_root=C:\testinstall\sdk\ "tools"
  2. I followed the instructions on this page to generate a LibGDX project, which consisted of (a) downloading the LibGDX Project setup tool “gdx-setup.jar”, (b) running java -jar ./gdx-setup.jar in the download folder (c) setting up the project as indicated and making sure to go to “advanced” and check the IntelliJ box.
  3. Next, I had to import the LibGDX project into IntelliJ. For that, I followed the steps on this page. I went to Import Project, navigated to my project folder and selected the build.gradle file. I Hit OK and in the next dialog, I unchecked the Create separate module per source set box and hit OK again. A final window will appeared asking which modules to import. I left everything checked and clicked OK.
  4. Now that the project was imported (finally!), I wanted to make sure it would run correctly. I continued with the notes on that page and followed their instructions:

    (a) Go to Run -> Edit Configurations...
    (b) Click the plus (+) button and select Application
    (c) Set the Name to Desktop
    (d) Set the field Use classpath of module to desktop
    (e) Click on the button of the Main class field and select the DesktopLauncher class
    (f) Set the Working directory to your android/assets/ (or your_project_path/core/assets/) folder
    (g) Click Apply and then OK.

  5. Now, I was planning on running this through the web browser as mentioned in the html section of this page, but I my localhost:8080 port is in use at the moment and causes conflicts if I try to use it for LibGDX. So instead, I decided to compile the program as an executable .jar file instead. To do so, I followed the Packaging for the Desktop instructions on this page – In the IntelliJ command line I typed gradlew desktop:dist and a .jar file containing all the necessary code and assets from the android/assets folder was created in my project’s desktop/build/libs folder.
  6. Lastly, I navigated to the .jar and ran the following in the command line to run it:  java-jar desktop-1.0.jar and voila, the “game” came to life! (Double-clicking it also works)
    Phew! It was a lot of work to get working, but now I have the basic layout setup so I can actually start developing some stuff with this. Pretty exciting!

My First Hackathon

Last weekend I attended my first hackathon! It was BostonHacks hosted by my alma mater Boston University. I’m still dizzy from how intense it was (and how little sleep I had!), but here’s the rundown on how it went.

I arrived at 10 AM on Saturday and registered, receiving a bunch of neat stickers and assorted swag, including a black hoody and a water bottle. For the first hour of so, I waled around to the handful of sponsors and talked with them about their products. With another hour before the event began, I decided it would be a good idea to start making some friends. I approached some people who also seemed to be by themselves and asked them if they were. Eventually, I got four other people to join me at a table and talk about the event.

We had two mid-level undergrads, two freshman and myself in our “team.” I took the liberty of introducing the two freshman to Git so that they could understand how we would share our code. Eventually, the event started, with an opening ceremony where the sponsors talked about the kind of projects they were looking into. As soon as they finished, we made a mad dash for the lunch line (there were about 100 people attending the event!). We sat down quickly, grabbed one of the available whiteboardsand started hammering throwing out ideas. We came up with some interesting stuff, but eventually decided to do “Twitter for blind people”, which I gave the code name Twinty.

The idea was pretty simple. Using this service, you would subscribe via text message to someone’s twitter feed, and whenever they tweeted you would get a phone call where the tweet would be read outto you. We decided to use a cool API called Twilio to handle the texting and calling. It also included a text to voice feature that we were able to take advantage of. I got the API code working correctly while a teammate got the twitter handling done. Another teammate worked on a feature to have the voice change based on emotional ques picked up in the text of the tweet (i.e. word choice and punctuation usage). I set up an AWS EC2 instance to host the service on, and we had to use an S3 bucket to store the tweets for Twilio to access.

We worked long into the night, taking a break for dinner and kept going into the night. It was so awesome and satisfying when we finally go the first calls to our cellphones and heard the tweets read aloud! With the servers set up, I decided to work on an Android front-end to make signing up for the service a little easier. Eventually it was 3AM and we decided to call it quits for the night. Two members returned to their dorms, while the rest of us camped out in the hall. I slept on the floor with a blanked I had brought and sort of slept for 3 hours. When we woke up, we grabbed a breakfast of pastries and continued on working. I took a break to brush my teeth, put on some deodorant and buy some snacks for the team and we kept on going until the judging took place. We ended up calling our project Spitter because “it speaks twitter!”

The judging was us standing at a table for an hour while judges walked around and asked us what we did. We demoed it and a lot of them were impressed, but in the end we didn’t win any prizes. However, the prizes really weren’t why I went. I went to work on a team, contribute and make something. The satisfaction of finishing 24 hours of coding and being able to point at something and say “I made this!” is far greater than any prize I could have received. I had so much fun. I really really loved the entire process. Sitting with teammates, discussing strategies, comparing code, seeing things work and struggling through when they failed. I really really want to do it again. I’m glad I went and I highly recommend it to anyone interested in programming just because of how crazy an experience it is.

Taylor's Blog © 2015